


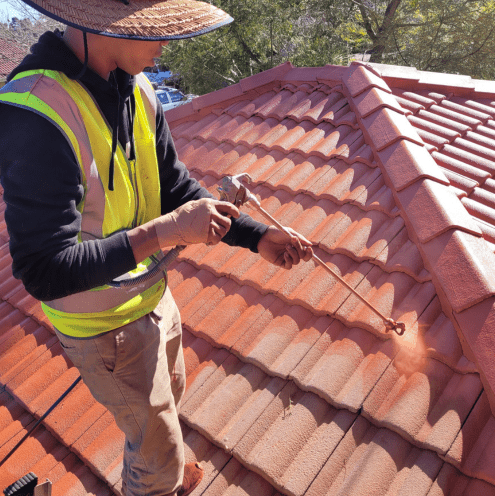
Maintaining the integrity of your house’s roof can help you protect your investment and ensure your family’s safety. In Melbourne, where erratic weather can cause issues before they become major concerns, regular roof inspections are very vital. If you are thinking of a roof restoration project, first-hand research is quite essential. This blog post will take you through a detailed process to enable you to properly check your roof in readiness for restoration.
Understand the Importance of Roof Inspection
Before starting the process, especially in Melbourne where extreme weather is widespread, one must first understand why a roof check is vital. Regular inspections assist you to identify minor issues before they become significant ones, therefore extending the lifetime of your roof and saving money over time. Only if the examination is comprehensive and correct will roof restoration—that is, cleaning, repairs, and resealing—have any impact.
Prepare for the Inspection: Step-by-Step Guide
Step 1: Safety First
Safety always comes first before starting any roof inspection. Especially in cases of insufficient preparation, roof inspections might be dangerous. Here’s how to keep safe:
- Use a Sturdy Ladder
Make sure your ladder is in good condition, correctly positioned, and on solid ground. It’s advised that you climb under someone else who is holding the ladder.
- Wear Proper Safety Gear
Get non-slip shoes to help you avoid sliding on the roof. If you are working at great heights or checking a steep roof, a safety harness is absolutely vital. Remember to don a protective helmet to guard against unintentional falls or impacts from falling trash.
- Weather Considerations
Never check your roof in bad weather—that is, during heavy rain, strong winds, or when the surface is moist and slick. Plan your inspection on a dry, clear day.

Step 2: Exterior Inspection
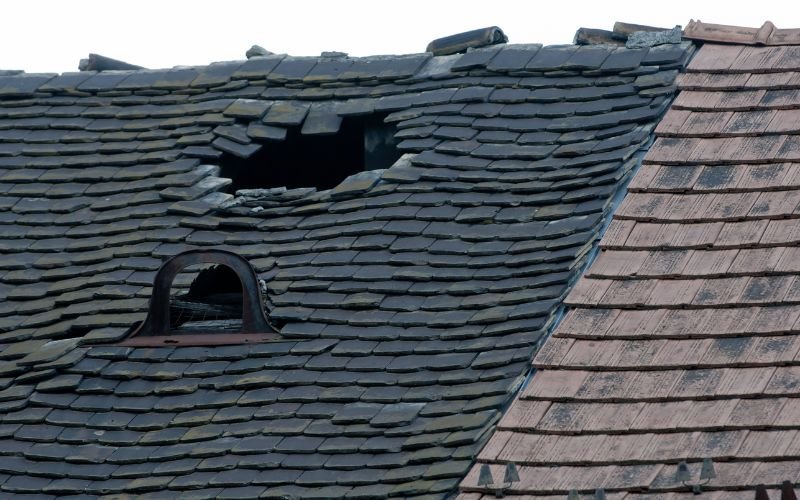
Look at your roof’s outside first to start your examination. Here, you will be able to spot obvious wear and tear or damage. Look for these here:
- Shingles and Tiles
Look for broken, cracked, or absent shingles or tiles. Look for places where the roof could be drooping; these could point to structural problems below the surface.
- Flashing and Gutters
Look at the flashing around vents, chimneys, and skylights. Water leaks can result from either loose or damaged flashing. Additionally, look for any damage or obstruction in the gutters that can let water back up onto the roof.
- Debris Accumulation
Check for places where debris, like leaves or branches, has gathered. Debris may trap moisture and, over time, cause the roof material to degrade.
- Usual Sites
Common sites where leaks could arise on a roof are chimneys, vents, and skylights. Look for any evidence of degradation, like cracks, corrosion, or seal gaps.
Step 3: Roof Cavity Inspection
Move inside to the attic or roof cavity, and then examine the roof from the inside. This section of the examination is absolutely vital for spotting latent problems that might not be obvious from the outside:
- Signs of Water Intrusion
Search the underside of the roof for water stains, damp areas, or mould development. These are certain signs of possible undiscovered water leaks.
- Insulation and Ventilation
Verify if the attic is well vented and insulated. Inadequate ventilation or insulation could cause moisture to develop, causing harm to the roof construction.
- Light Penetration
Turn off the attic lights and search for any areas where the roof shows daylight. These voids must be filled during restoration, as they might be possible water entrance locations.
Step 4: Check Flashing and Seals
Stopping water from seeping into the roof in sensitive areas depends mostly on flashing and seals. Look especially at these places throughout your inspection:
- Flashing Integrity
Review the flashing around vents, chimneys, and skylights. Look for gaps, fractures, or corrosion. To stop leaks, damaged flashing has to be either rebuilt or replaced.
- Seal Condition
Examine the seals surrounding roof penetrations to be sure they are whole and not degrading. Worn or broken seals can let water soak in and, over time, cause harm.
Step 5: Assess Shingle Condition
The general state of your roof is often revealed by the condition of its shingles or tiles. Examine this here:
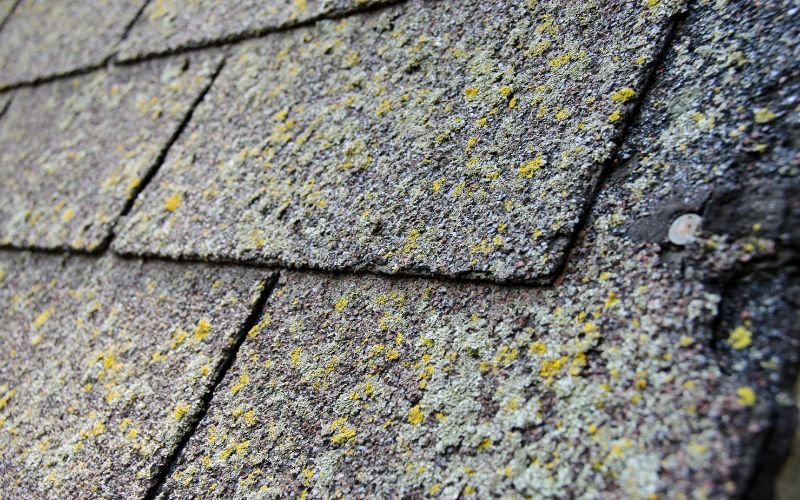
- Curling and Cracking
Search for shingles exhibiting evidence of cracking or curling at the margins. These are ageing shingle indicators that could not provide sufficient protection.
- Blistering
Blistering shingles point to either retained moisture or too much heat, which, if not treated, may cause more harm.
- Granule Loss
Check your downspouts and gutters for a high accumulation of grains. An indicator of shingles’ degradation and possibly the need for replacement is granule loss.
- Moss and Algae Growth
Decaying results from moisture trapped against the roof by moss and algae. If you see notable expansion, you might want to think about roof restoration.
Step 6: Check for Leaks
When it comes to roof damage, leaks first come under major concern. If not quickly handled, even little leaks can cause major problems:
- Water Stains
Look for water stains on the walls and ceiling—clear indicators of roof leaks. Usually appearing as discoloured patches, these stains may develop over time.
- Peeling Paint
Peeling paint on ceilings or walls can also point to moisture issues brought on by a leaky roof.
- Dampness in Roof Cavity
Look for any evidence of moisture or water droplets in the roof hollow with a flashlight. These can indicate current leakage that calls for a quick response.
Step 7: Evaluate Roof Structure
The lifetime and efficiency of your roof depend critically on its general construction. Examining the roof construction closely will enable you to find major problems:
- Sagging Roof
Look for any places the roof seems to be drooping or dipping in. Often resulting from either continuous water damage or the weight of trash, sagging might point to structural vulnerability.
- Condition of Fascia, Soffits, and Eaves
Condition Look for evidence of warping, insect damage, or decay on the fascia boards, soffits, and eaves. Supporting the roof and keeping moisture out of the building depend on these elements.
- Signs of Rot or Insect Infestation
Particularly in the supporting construction of the roof, look for any indications of wood decay or insect infestation. These problems might endanger the integrity of the roof and call for expert roof repair specialist in Blackburn or surrounding suburbs in Melbourne.

Step 8: Consult with Professionals
Although a do-it-yourself roof check can point up a lot of problems, some call for the knowledge of licenced roofers. See roof repair experts in Boronia or your neighbouring suburb if you run into any major problems or doubt your results:
- Expert Assessment
By means of specialised equipement and knowledge, a professional roofer may more precisely evaluate the state of your roof, therefore identifying issues that might not be obvious to the unskilled eye.
- Restoration Advice
Whether modest repairs, a complete roof restoration, or even a replacement, roofing experts can advise on the best line of action for restoration.
- Cost Estimates
Professionals may also offer thorough pricing estimates, which will enable you to budget for your roof repair project in Ringwood or any suburb in Melbourne.
Step 9: Understand the Roof Restoration Process
If your examination reveals restoration is required, it is essential to know the steps involved:
- First, the roof should be completely cleaned to get rid of trash, algae, moss, and grime. This guarantees appropriate adhesion of the restoration materials and helps prepare the surface for repairs.
- Any damaged or worn-through area—like cracked tiles or degraded flashing—will be repaired or replaced. This stage tackles the underlying causes of the damage and prevents more problems.
- Once the repairs are finished, the roof gets a protective sealant or coating. This increases the roof’s beauty, helps to weatherproof it, and prolongs its lifetime.
- Following the completion of restoration, a last inspection guarantees that all problems have been resolved and that the roof is in its its best shape.
Step 10: Schedule Regular Inspections and Maintenance
Repairing a roof does not define its upkeep. Plan frequent inspections and repairs to help your roof remain in good shape and increase its lifetime. Here is how:
- Aim to check your roof at least once a year, ideally in spring or fall. This enables you to identify any abnormalities before they start to cause major concerns.
- Following every significant weather event—including a storm or strong winds—do an inspection to find damage.
- To prevent damage, routinely clean your gutters, clear trash from the roof, and cut overhanging limbs.
Conclusion
The first key to a good restoration job is a comprehensive roof assessment. Following this detailed advice will help Melbourne residents spot and fix probable problems early on, thereby guaranteeing that their roof is in the best possible state before repair is started. Always give safety top priority; conduct frequent inspections; and, when needed, see experts. Not only does a well-kept roof guard your house, but it also increases exterior appeal and value, therefore giving years of peace of mind.
-
 March 13,2026
Roof Flashing Around Chimney Is Leaking
-
February 3,2026
Possum vs. Roofer: Who is Actually Responsible for That Hole?
-
January 12,2026
Why Your Roof Restoration Must Include Pest-Proofing
-
December 19,2025
How Gutter Pitch Errors Lead to Roof Valley Damage
-
November 27,2025
How to Spot a Dodgy Roof Quote in Melbourne
-
November 13,2025
Maintenance Tips for Slatted Roof Systems in Melbourne
-
October 30,2025
Colour & Style Trends for Roofing in Melbourne
-
October 7,2025
How to Prevent & Fix Flat Roof Leaks in Melbourne
-
September 29,2025
Role Of Ember Attack In Roof Ignition & How To Prevent It
-
September 16,2025
Roof Ventilation and Repairs: Why Melbourne Homes Overheat
-
August 19,2025
Roof Leak or Plumbing Leak? How to Tell the Difference in Homes
-
August 4,2025
Gutter and Roof Safety Tips Before Bushfire Season in Victoria
-
July 18,2025
The Ultimate Roof & Gutter Maintenance Checklist for Melbourne Homeowners
-
July 9,2025
Guide to Roof Tile Types in Australia and How to Repair Them
-
June 26,2025
Metal vs. Asphalt: Which Roofing Material Lasts Longer?
-
June 6,2025
Drones in Roofing: How We Inspect Roofs Safely and Quickly in Melbourne
-
May 14,2025
5 Common Roof Problems in Coastal Areas (and How to Prevent Them)
-
April 16,2025
Dealing with Gutter Blockages During Melbourne’s Rainy Season: Repair Tips & Tricks
-
March 27,2025
Tile Roof Restoration – Key Signs Your Tiled Roof Needs Attention
-
March 7,2025
How to Get Your House Ready for Roof Restoration
-
February 28,2025
Why Is Your Roof Paint Peeling? Top Causes and Solutions
-
February 10,2025
The Importance of Roof Inspections Before Buying a Home in Melbourne
-
January 15,2025
Heat-Reflective Roof Restoration Coatings Lower Energy Bills
-
January 9,2025
The Hidden Dangers of Roof Mould: How It Affects Your Home and Health
-
December 26,2024
Why Melbourne’s Summer Is the Ideal Season for Roof Restoration
-
December 17,2024
Rooftops Around the World: Comparative Analysis With Australia’s Superior Guidelines
-
November 25,2024
Why Gutter Cleaning in Melbourne is Crucial Before the Winter Season
-
October 19,2024
Common Roof Problems in Melbourne: Causes and Effective Solutions
-
September 30,2024
Roof Repair Signs: What Every Melbourne Homeowner Should Know
-
September 23,2024
Tips to Maintain and Extend the Life of Your Restored Roof in Melbourne
-
August 12,2024
Restoration vs. Repairs: Choose the Right One for Your Home


